Weapons
Weapons are assets that live in your project that allow to configure how a specific weapon works.
Multiple Weapons in a single one
There are some cases where you'll have weapons that contain multiple shooting modes, such as an Assault Rifle that also launches grenades. In these cases you should create two Weapon assets and equip them on the same prop.
You can equip as many Weapons as you want.
Overview
To create a Weapon asset, right click on the Project Panel and navigate to Create → Game Creator → Shooter → Weapon. This will create a new Weapon asset that you can move anywhere you want.
Weapon Data
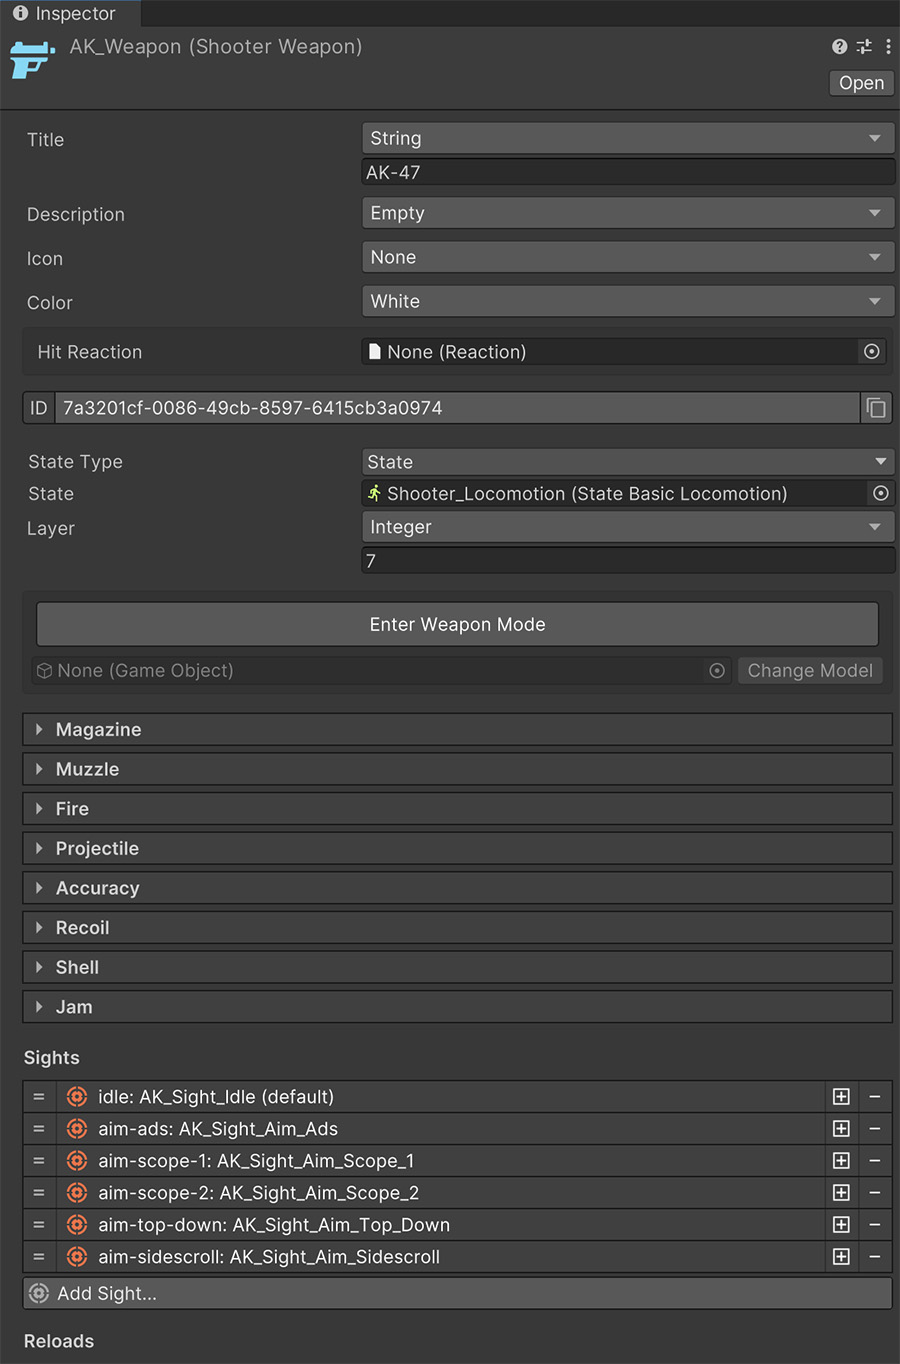
Starting from the top there are the common fields:
- Title: The name of the weapon. Useful for representing it in the user-interface or inventory.
- Description: The description of the weapon, if necessary.
- Icon: An icon Sprite associated with the weapon, if necessary.
- Color: A color associated with the weapon, if necessary.
The next field is the Hit Reaction which is an optional field. If a Reaction is set, every time this weapon shoots and hits a character, it will attempt to play a reaction on it.
If no Hit Reaction instance is set and the character doesn't have a default reaction, the receiving character won't play any reaction at all.
The ID field uniquely identifies this weapon among the others. Despite being able to equip any number of weapons simultaneously, it is forbidden to equip two weapons that share the same identifier.
The Weapon can optionally make the character enter an animation State. These states can also contain an On Enter Gesture which can play the drawing animation of the weapon, and aiming with it.
The Layer field determines at which layer the State (if any) will be played.
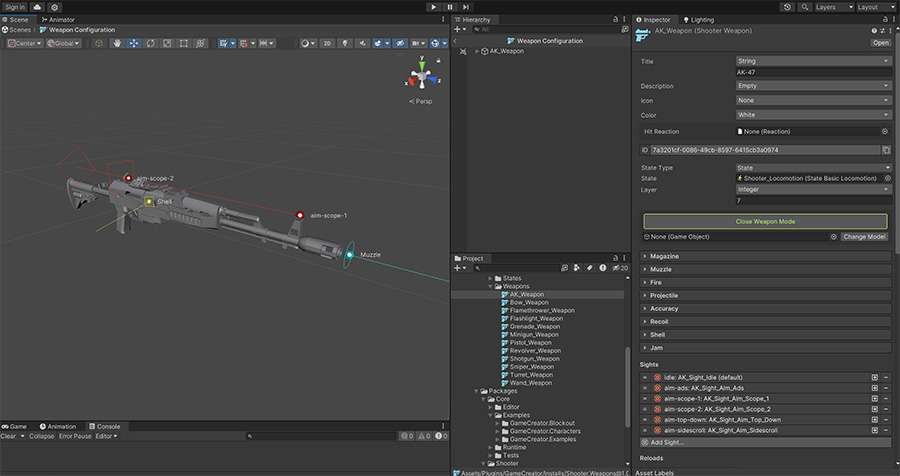
Weapon Mode
To configure a Weapon more easily you can click on the Enter Weapon Mode button and the scene will change into one with a single weapon model in the scene.
Changing the 3D model
The Weapon asset doesn't know which 3D model it will be used on. So by default it displays a water-gun model. You can change it into the model you'll be using to more easily configure the weapon by selecting the model in the Change Model field and clicking on the corresponding button.
Unity will remember this selection so every time you open this Weapon mode the new model will be picked.
Entering the Weapon Mode will change the Scene View and Hierarchy Panel into a new one similar to how entering prefab mode.
In this mode you can configure:
- The Muzzle: The tip of the muzzle is represented by a blue dot with a line that determines the direction in which projectiles are shot from.
- Sights: Sight points that the character will use as anchor points to determine the best position to aim from, represented with the red color.
- The Shell Ejection: A yellow point indicating a direction from which shells will be ejected from (if any).
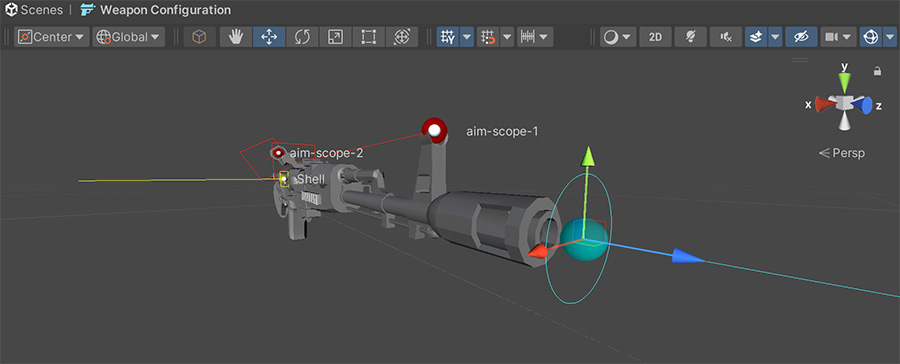
To modify all of these options, simply click on the white dot and use the Unity handles to translate and rotate the source point and direction to the desired location.
Magazine
The Magazine section is an expandable field that configures the type of ammunition the weapon uses.
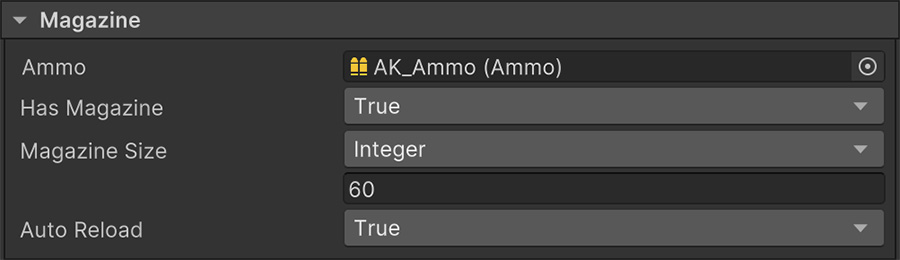
The Ammo field must reference an Ammo asset. For more information about what and how to configure ammunition see the Ammo section.
The Has Magazine field determines whether the whole ammunition is used without having to reload (when false) or the weapon has a fixed magazine size from which the ammunition must be loaded to before shooting (when true).
If the Weapon does have a magazine you can determine its size in the Magazine Size field.
The Auto Reload boolean field allows to define whether the character will attempt to reload the weapon when there is no ammo in the magazine (if any) and the character is trying to shoot with it.
Auto Reload for Player and Enemies
The Auto Reload field is not only useful for the player but also for creating enemy AI. By switching this field to true you can skip checking whether an enemy has enough magazine ammo to shoot the player and simply focus on the bang-bang.
Muzzle
The Muzzle section configures where in the model is the point and direction from where projectiles are spawned.

Using the Scene View
Although the Position and Rotation of this field can be manually modified, it is easier to set by entering Weapon Mode and moving the muzzle gizmo handle (the blue one).
Fire
The Fire section determines how the weapon behaves when attempting to shoot with it. To know more about how to shoot with a weapon, see the Shooting section.
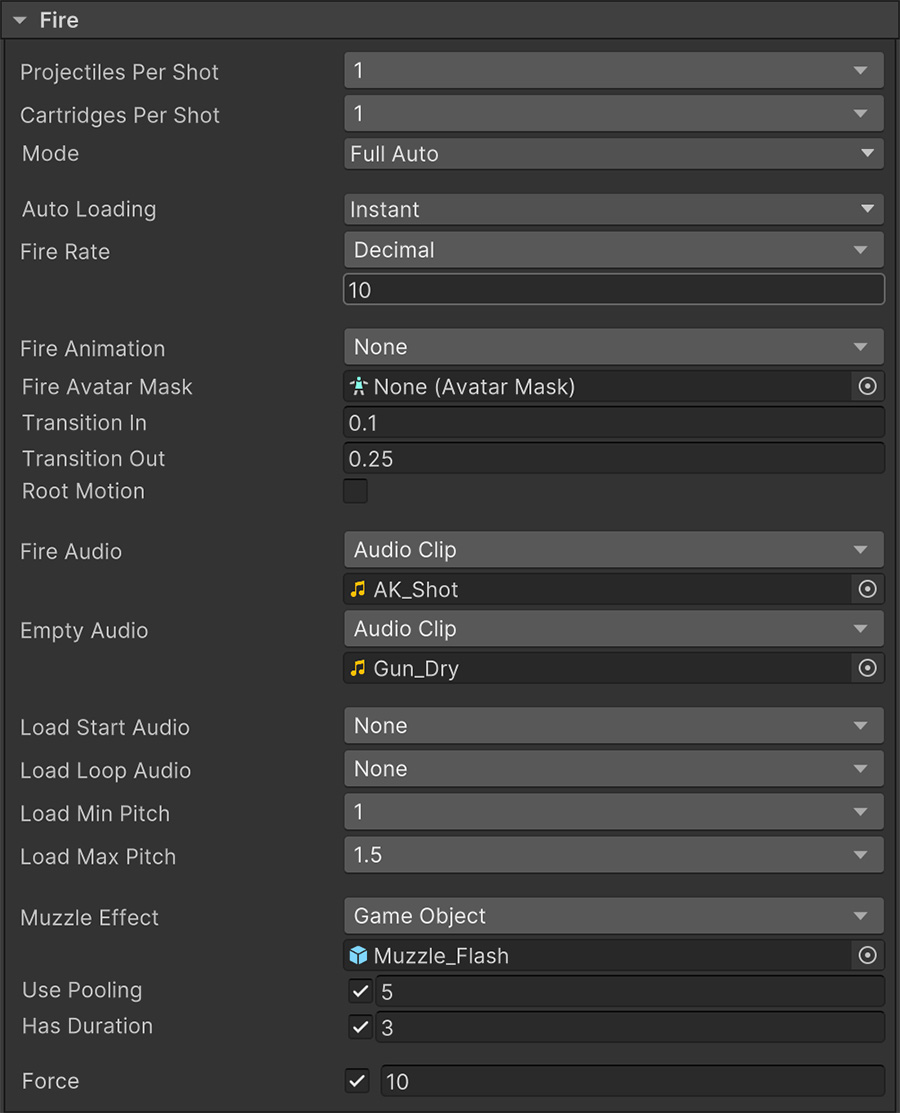
The Projectiles per Shot determines how many projectiles are used in a single shot action. The Cartridges per Shot determines the amount of ammo used in a single shot action.
Playing with Ammo and Projectiles
A Shotgun that shoots pellets will likely have more than 1 Projectiles per Shot because a single shot shoots multiple bullets in a spread area.
On the other hand some weapons might have an alternate shooting mode that uses 4 Cartridges per Shot and the potency of those shots is multiplied by a factor, at the risk of wasting more ammo each time the player misses.
The Mode is a dropdown field that allows to pick how the weapon behaves when pulling and releasing the trigger.
For more information about the firing modes check the Fire Mode section.
The Fire Animation field allows the character to play a Gesture when shooting.
The fields below allow customizing how this animation plays out, including the Avatar Mask for playing only a certain set of bones of the character, set the Transition In and Transition Out when blending from the current pose as well as choosing whether the character should respect the root motion of the clip or not.
Not using a Fire Animation
For mechanical weapons, such as pistols and rifles, you might want to skip setting an animation and use procedural aiming and recoil. The animation field is meant to be used for cases where the shot is not as precise, such as waving a wand or casting a spell using a hand gesture.
The Fire Audio allows to play a sound effect when shooting with the weapon.
If the weapon doesn't have any available ammo however, the Empty Audio clip will be used instead (if any).
The Load Start is an audio clip that is played as soon as the player presses the weapon's trigger. Although this usually coincides with the shooting, in some cases, such as the Charge fire mode or Full Auto with Progressive or Wait to Load.
Using Load to Start
The common scenario is playing a rope stretching sound when starting to pull a bow or the gas vault release on a flamethrower weapon.
The Load Loop field is an audio clip that is only used if the weapon's fire mode is set to Charge or Full Auto. This will allow the weapon to play a continuous sound effect starting at a Min Pitch value all the way to Max Pitch if the weapon has any kind of progressive mode.
The Muzzle Effect will instantiate a game object at the muzzle's position every time the weapon takes a shot.
Muzzle Flashes
The Muzzle Effect field is the perfect place to instantiate a gun's muzzle flash. The object can be pooled for maximum performance, by ticking the Use Pooling checkbox.
The Use Force is an optional field that when ticked, it will allow the projectile shot to apply a force onto any Rigidbody collision. If the checkbox is not marked, the projectile won't apply any force at all.
Projectile
The Projectile section configures how the shot behaves once the weapon is instructed to take the shot and make the projectile leave the muzzle.
The Shot field controls what type of projectile is shot and its values change depending on the option chosen.
For more information about the types of projectiles available check the Projectiles section.
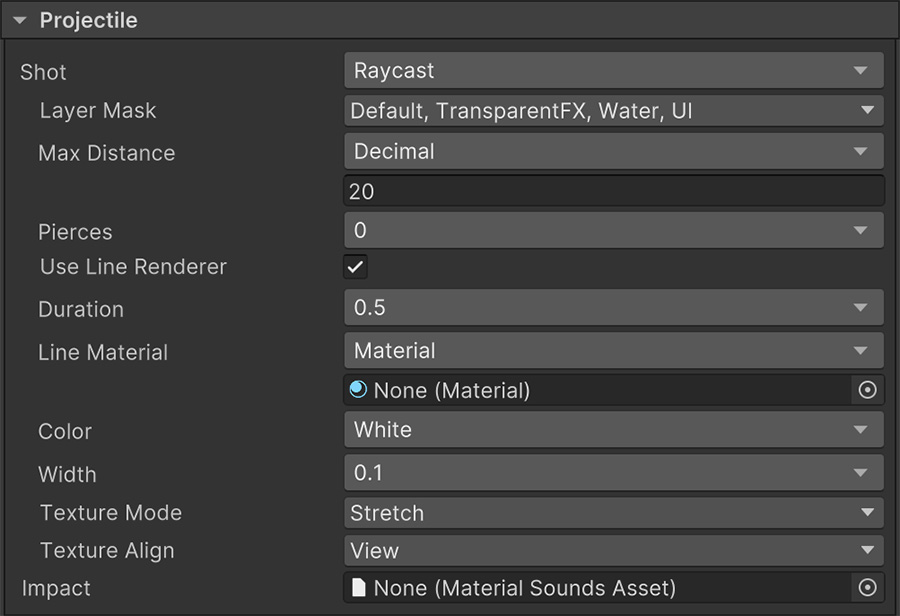
The Impact field is optional and allows to attach a Material Sound asset that will be used at the point of impact of any projectile shot when colliding with another object.
Impact Effects
The Impact field is useful for playing different sound effects depending on the surface impacted and leaving behind impact decals.
Accuracy
The Accuracy section configures how the weapon behaves over time between shots.

What is Accuracy?
Before digging into each of the fields, understand that each weapon has an internal accuracy value between 0 and 1, which indicates how accurate is the character when shooting in a direction.
For example, if a character has an accuracy of 0 means that each shot will bullseye the target with a maximum precision. However after taking a shot, the accuracy will likely decrease due to the settings explained below, which makes each consecutive shot less precise, up to a maximum.
The Max Spread X and Max Spread Y fields indicate, in angle degrees, the maximum amount of error the projectile will have when the accuracy value is at its minimum (usually when sprinting or after shooting a barrage of bullets with an assault rifle).
The Spread Bias is a field between 0 and 1 that indicates the chance of a projectile landing towards the desired direction or the outer-rim of the maximum spread factor.
Understanding the Spread Bias
In other words, if the character is sprinting and its accuracy is at its minimum, the Spread Bias determines whether most shots will land at the center of the target (a value of 0) or towards the edges of the circle defined by the Max Spread fields.
The Accuracy Recover indicates the speed rate at which the accuracy factor will recover, in seconds.
Motion Accuracy indicates the maximum accuracy a weapon will have when a character is moving and the Airborne Accuracy indicates the same when the character is not grounded.
The Accuracy Kick value indicates how much the accuracy factor decreases with each shot. For example a value of 0.25 means that each shot will reduce by 25% the accuracy value.
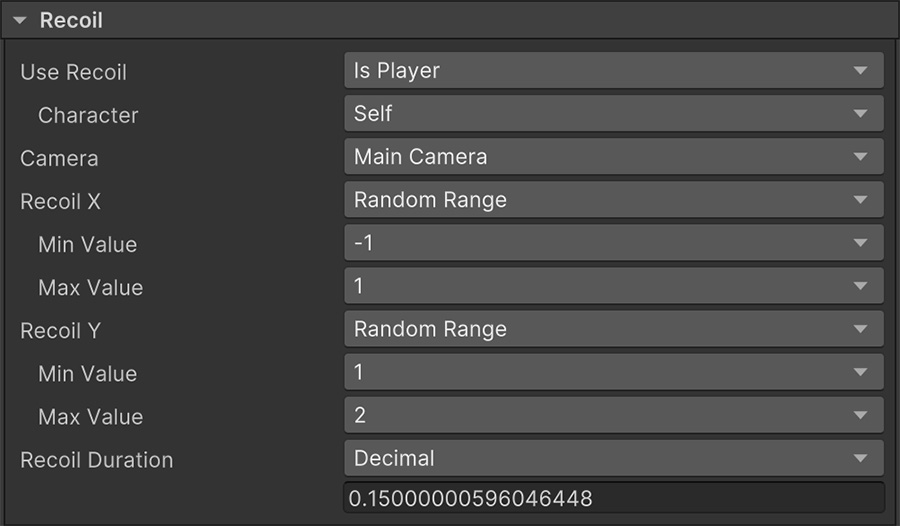
Recoil
The Recoil section allows to configure how the camera behaves when shooting with a weapon.
Recoil vs Accuracy
The Recoil value is separate from the Accuracy because recoil is meant to only affect the camera. Hence, in most cases will only affect the player.
While the Accuracy is an internal value that recovers over time, the recoil is a system that moves the camera on different directions after each shot, making it more or less hard for the player to aim after each consecutive shot.
The Use Recoil field determines whether to use or not recoil effects. By default it checks whether the character wielding the weapon is the player or not.
The Camera field is used to identify which camera will be affected by the recoil, and the Recoil X and Recoil Y values indicate, in angle degrees, how much the camera will rotate after each shot.
The Recoil Duration is the time it will take for the camera to rotate towards the desired recoil rotation after each shot.
Shell
The Shell section optionally configures the ejection of empty shells on the weapon.
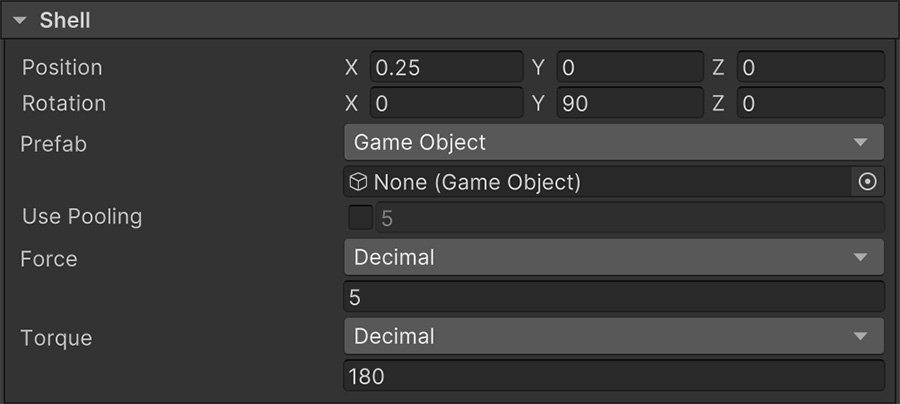
The Position and Rotation fields indicate the point and direction at which shells are ejected from.
Using Weapon Mode
It is recommended to set these values by entering Weapon Mode and transforming the yellow gizmo handles.
The Prefab field is required if a weapon is going to eject a shell and it's a reference to a prefab object that will be instantiated at the shell's position and rotation.
The Use Pooling field allows to improve performance by re-using previous prefab instances and it's automatically handled by the module after ticking the checkbox.
The Force and Torque fields determine the force at which shells are ejected and rotated.
Using high Torque
The Unity physics engine has some limitations when rigidbodies have high rotating velocities and it limits the angular speed at which an object can rotate in order to avoid the whole physics to become unstable.
Ejecting shells
To eject a shell from a weapon all that needs to be done is to use the Eject Shell instruction.
Most semi-automatic weapons will eject the shell right after shooting, so the On Shoot instruction list is the perfect place to add the instruction.
However others like a pump-action shotgun will eject the shell after pumping the weapon.
It's up to the game designer to pick the best place to eject a shell from.
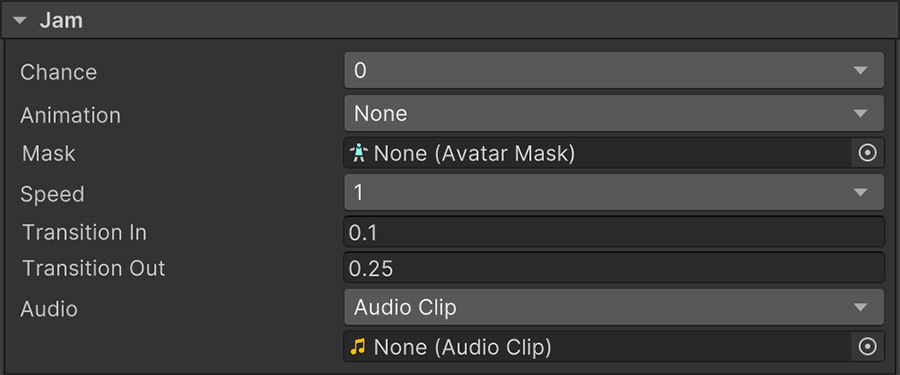
Jam
The Jam section configures whether a weapon can get jammed or not, and the animations to fix it.
What is Jamming
Jamming is a built-in mechanic in the Weapon asset that allows them to become not operational while the weapon is jammed. A weapon can become jammed right before shooting and it must be fixed before being able to fire or reload again.
The Chance field indicates the probability of a weapon becoming jammed. By default a value of 0 will prevent a weapon from ever jamming, but increasing this value will add a chance.
Dynamic Chance
The Chance field is dynamic and can change depending on different conditions. For example, a character getting into mud water or rain pouring can increment the chances of a weapon being jammed.
The Animation field defines an animation that will be played when fixing a weapon. Note that the player will fix the weapon after the animation finishes.
The Avatar Mask allows the animation to be played only on a specific set of bones, and the Transition In and Transition Out fields control the blending duration of the animation.
The Audio field allows an audio clip to play when fixing the weapon.
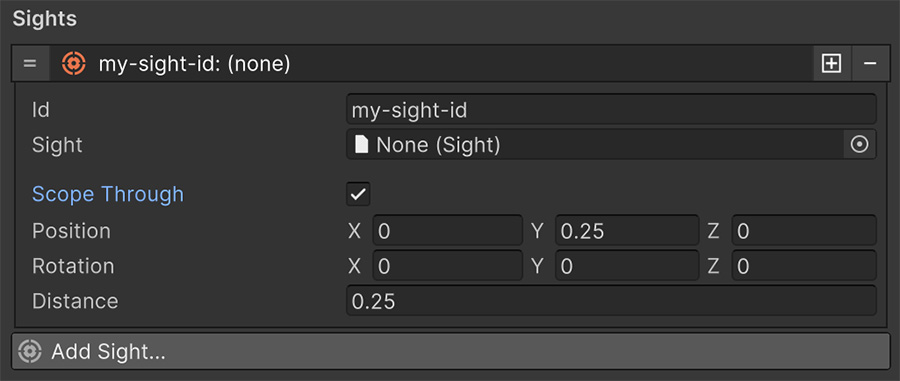
Sights
The Sights section contains collection of Sight assets that are uniquely identified by a name.
A Weapon can have 1 or more Sight entries, and each one allows the character to change its aiming mode (or pose).
For more information about what the Sight asset is and how to use them see the Sights section.
A list entry contains an ID field which uniquely identifies the Sight in the Weapon. This value is used to switch between Sights during gameplay.
The Sight field is mandatory and is where all the Sight information is located.
The Scope Through checkbox allows to define a position and a distance from which the character will look through the weapon when aiming. This can only be used if the Sight asset uses the Human IK bio-mechanic option.
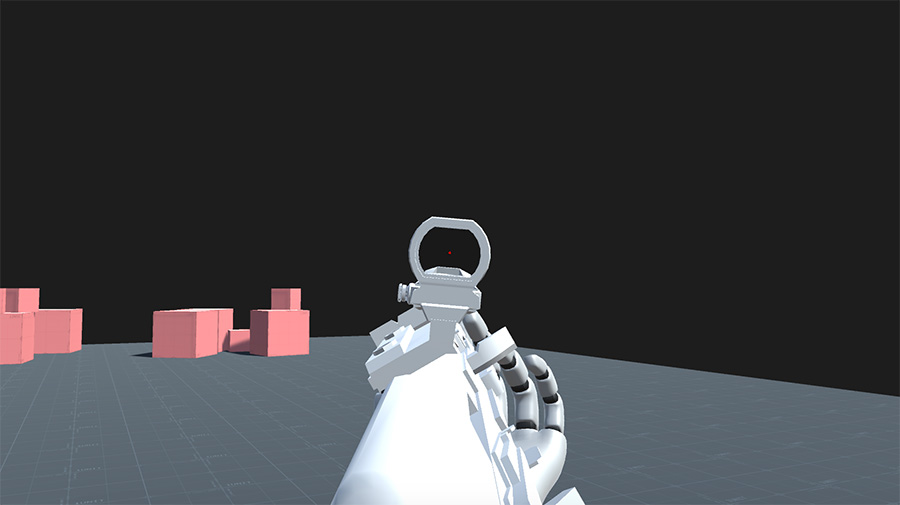
When to use Scope Through
This option is mostly used in first-person perspective games where the weapon is aligned with the main camera.
We recommend not using it for other perspectives because the alignment feels too forced and procedural animations generally look better with forward kinematics from afar.
If the Scope Through option is checked it reveals a Position, Rotation and Distance fields. These fields define the position and direction of the scope in local space, as well as the distance from the eye of the character.
Set using Weapon Mode
These values can be set entering Weapon Mode, which is generally easier to do.
Reloads
The Reloads section configures how a weapon can be reloaded and choose with Reload asset to use.
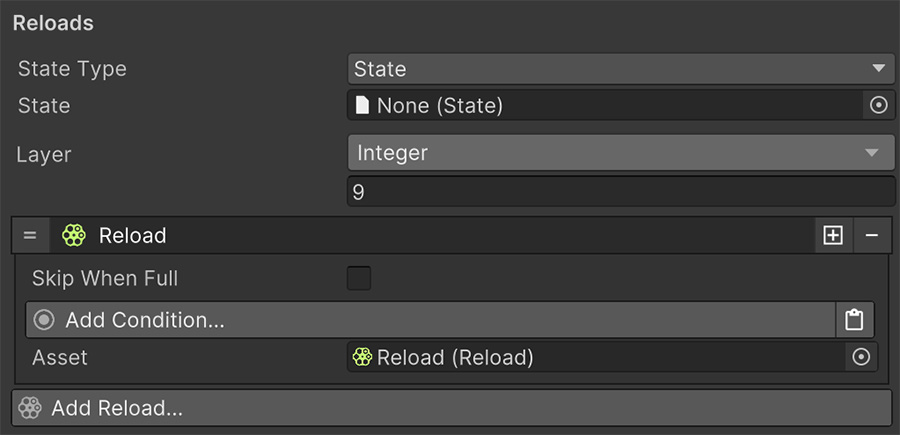
During a weapon's reload operation the character can optionally enter an animation State. The State field allows to pick one as well as which Layer to set it.
When to use an animation State
The animation State can be ignored in most cases, since each Reload asset will play its own animation clip and will override the State. However there are some cases where having an animation pose below might be useful.
The examples included in this module contain a Revolver weapon that reloads its bullets one by one. Each time it picks a bullet from the pocket and puts it in the chamber is a single Reload asset being executed, while in the background, the Revolver model sits in front of the character with the chamber open.
In these cases where cartridges are loaded one by one, an animation State allows to play an enter and exit animation while having a pose in the background makes all animations flow seamlessly.
The next field is a list of Reload entries.
How a Reload asset is picked
When attempting to reload a weapon, the weapon will start checking from the top-most Reload entry and will check its conditions.
If there are none or the conditions are true then it will pick that Reload asset and run it.
Otherwise it will jump to the next one and check whether it is a suitable candidate or not.
A Reload entry contains a Skip when full field, which allows to skip the entry if the weapon has its magazine full.
The Conditions below allow checking whether this entry is a suitable one or not. If no conditions are present, it automatically returns success.
The Asset field is a reference to the Reload asset, which is mandatory in order to play a reload animation, and contains all the necessary information to perform a reload action.
Weapon Animations
The Weapon Animations section contains a list of optional animation clips that can play under different circumstances on the weapon's prop model.
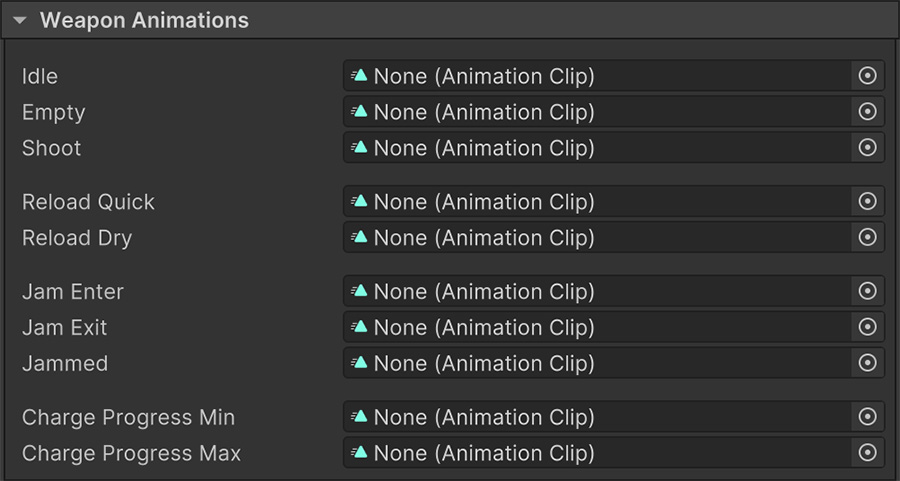
When to use Weapon Animations
In most cases you won't even need to use weapon animations, and we recommend leaving them until all the other settings have been properly configured.
However in some cases, where the weapon changes its shape depending on its state (whether it has been jammed, it's there's no bullet in the chamber, etc...) you might want need to provide an animation to the weapon.
Animator Required
In order for the weapon to use these animations, the weapon model's root object must have an Animator component.
Instructions
The bottom section of the Weapon asset is dedicated to adding your own custom logic via Instructions and Conditions.
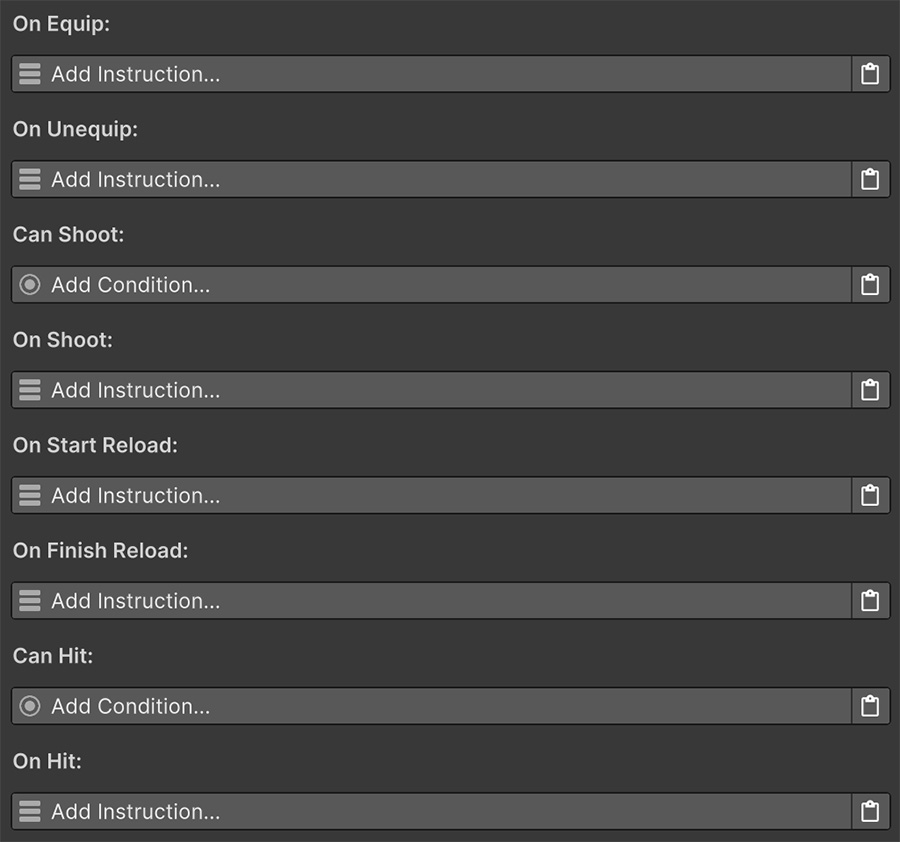
On Equip
The On Equip instructions are executed every time the weapon is equipped using the Equip Weapon instruction. Self refers to the character wielding the weapon while Target points at the weapon model.
Useful for...
This is a good place to initialize stored information and instantiate its attachments.
On Unequip
The On Unequip instructions are executed when the weapon is unequipped using the Unequip Weapon instruction. Self refers to the character wielding the weapon while Target points at the weapon model unequipped.
Useful for...
Just like its counterpart, this is the perfect place to destroy or undo those actions done in the On Equip instructions.
Can Shoot
The Can Shoot conditions are checked every time the character attempts to shoot with the weapon. Returning a false value will prevent the weapon from shooting.
Self refers to the character wielding the weapon while Target points at the weapon model unequipped.
Useful for...
Situations where the character shouldn't be able to jump, like a cinematic sequence or being inside a non-combat zone.
On Shoot
The On Shoot instructions are executed every time the character successfully shoots with the weapon. Self refers to the character wielding the weapon while Target points at the weapon model unequipped.
Useful for...
Ejecting shells and making noises (if paired with the Perception module).
On Start Reload
The On Start Reload instructions are executed every time the character starts reloading the weapon. If multiple reloads are chained together, these instructions will only run the first time, until the weapon is fully reloaded or the reloading operation is canceled. Self refers to the character wielding the weapon while Target points at the weapon model unequipped.
On Finish Reload
The On Finish Reload instructions are executed every time the character finishes reloading the weapon. Whether that is because the weapon has been fully reloaded or the user has canceled the reload. Self refers to the character wielding the weapon while Target points at the weapon model unequipped.
Can Hit
The Can Hit conditions are executed for every object that the projectile (in any mode) reported as a hit. If these conditions are empty or the conditions return true the object is considered as hit and will run the On Hit instructions from below.
Self refers to the character wielding the weapon while Target points at the object reported as a hit.
Useful for...
Filtering objects and characters that shouldn't receive a hit. For example, if you disable friendly-fire, allies of the character shooting should return false.
On Hit
The On Hit instructions are executed for every object that the projectile (in any mode) reported as a hit and the Can Hit conditions did not filter.
Self refers to the character wielding the weapon while Target points at the object reported as a hit.
Useful for...
Applying damage and effects onto each object hit by the projectile.