Motion Link
This asset allows characters to define a shared logic for Traverse Link components, including the animation used to traverse the environment, effects and more.
Asset
To create a new Motion Link right click on the Project Panel and select Create → Game Creator → Traversal → Motion Link.
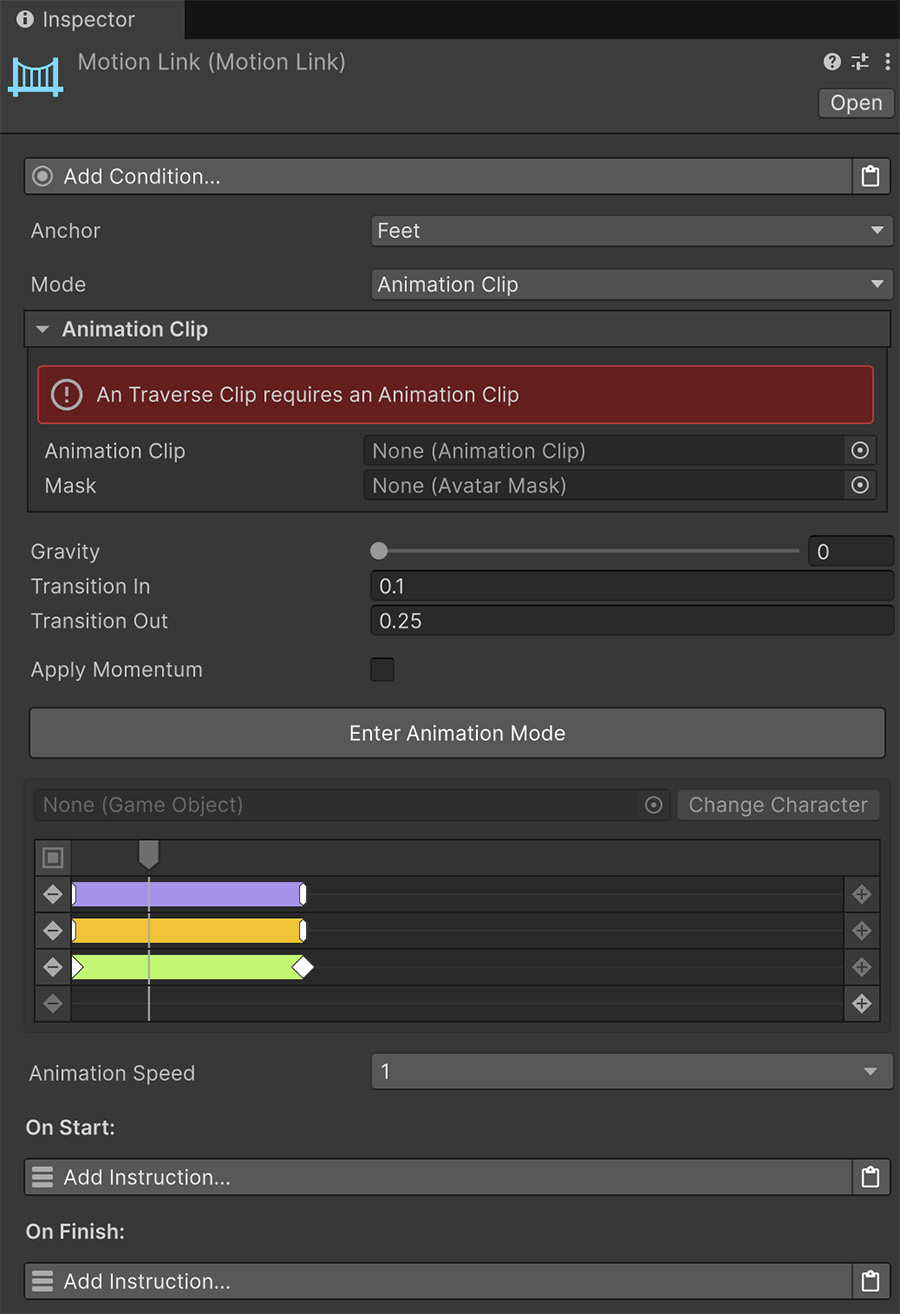
The Conditions at the top run every time the Traverse Link attempts to run on a character. If these conditions are not satisfied, the traverse component won't run.
The Anchor field determines the point of origin from the character's perspective. Its values can be:
- Crown: The top-most point of the character.
- Center: The center of the character, usually around the belly.
- Feet: The bottom-most point of the character, usually touching the ground.
When a Character starts to run a Traverse Link it moves from a start position to the end position. This start position is relative to the anchor of the Motion Link.
When to use each Anchor
For traverse components that are at ground level it is recommended to use the Feet option.
The Crown option should be used when character's anchor position is at the top of their head, such as when sliding down a zip-line.
The Center is usually used when the character moves vertically along an obstacle path, such as a ladder.
The Mode determines the type of animation played when running the traverse component. It can run either an Animation Clip sequence or use an animation State.
More about Mode
The different options for Mode are covered in more detail in Animation Clip and State
The Gravity field is a multiplier that determines how much gravity affects the character while traversing. A value of zero means there's no gravity and a value of 1 means gravity is left untouched from the character.
Transition In and Transition Out fields determine the time (in seconds) it takes for the animation to fade in and out from the character's locomotion.
The Apply Momentum toggle allows the traverse to imbue some momentum to the character when finishing the traversal movement.
When to use Momentum
Some parkour movements finish with a great sense of momentum.
For example, a zip-line finishes with a character letting go. If the character would suddenly stop after exiting the zip-line it would break the sense of momentum. The Apply Momentum checkbox allows the character to retain its end velocity for a set of time as well as the duration at which it will slowly retake control over the direction.
Mode: Animation Clip
The Animation Clip mode allows to play an animation clip that is used to determine the duration of the movement and play different effects at different points when executed.

The Animation Clip field at the top is necessary for the Motion Link to work. Adding an animation clip will enable the rest of the options.
The Mask is an optional field that allows to filter the body parts that will play the animation on a humanoid avatar.
The Sequence timeline allows adjusting various properties throughout the execution of the animation clip.
Using the Sequencer
The Sequencer is the timeline that has multiple tracks. Click on the Enter Animation Mode to view the default character execute the animation clip provided. Scrubbing the timeline will represent the animation pose in the scene view.
-
The Purple track is called Motion Warping Translation and determines what portion of the animation will warp from the start position towards the end position. The rest of the range will use the animation's root motion.
-
The Yellow track represents Motion Warping Rotation and determines the portion of the animation where the character will rotate from its initial rotation towards its targeted rotation. The rest of the range will use the animation's root motion.
-
The Green track represents the Gravity and determines how gravity affects the character in that portion of the animation.
-
The last allows to execute Instructions and specific points. Useful for visual and sound effects.
Selecting any of the tracks will reveal a section below with all the necessary options to adjust their behavior.
The Animation Speed determines how fast the animation plays. A value of 1 means the animation will play at its default speed.
The final On Enter and On Exit instructions are executed when the character enters and exits the Traverse Link, respectively.
Mode: State
The State animation mode allows the character to use an animation State in order to move the character from its start position to its end.
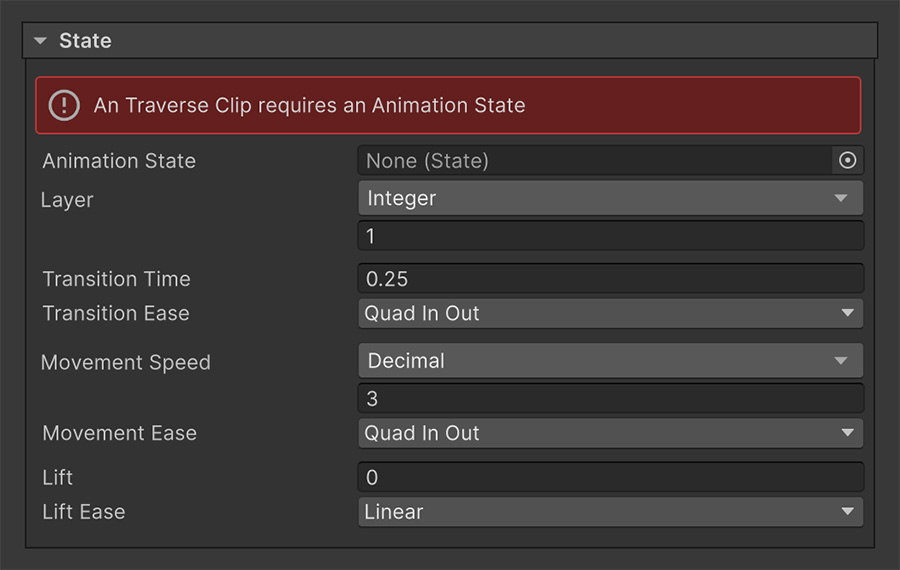
The Animation State field is required and is the state in which the character enters at the Layer specified while traversing the obstacle.
The Transition Time is the time it takes for the character to blend between its current locomotion animation to the animation(s) in the specified State.
The Transition Ease is the easing applied to the blend between the current locomotion and the animation's State.
The Movement Speed and Movement Ease are the speed at which the character moves from the starting position to the targeted position.
Speed instead of Duration
Note that Motion Links with the State mode use a speed field instead of a duration. This means that not all obstacles will take the same duration to complete. Instead, longer obstacles will take proportionally longer.
The Lift and Lift Ease is an optional parameter that allows characters to draw a vertical arc when moving towards the target.
Using Lift
For example, in order to make the wall-run feel more realistic, the character starts describing a vertical arc upwards when starting to run and slowly goes down with the momentum.